French Boule
Tired of spending too much money for bread? Intimidated by the thought of sourdough? This recipe is for you.
Note- credit where credit is due…this is basically master baker, Richard Bertinet’s recipe-with some slight modifications. If you want to dive deeper into the art of bread making, I highly recommend checking out his books or YouTube.
Servings- Full Loaf: 1 loaf (about 8-10 slices)
Prep Time: 15 minutes (mixing & kneading)
Resting & Proofing Time: 2.5 to 3.5 hours (includes autolyse, first rise, and second proof)
Bake Time: 45-50 minutes
Total Time: Approximately 3.5 to 4.5 hours (including resting and baking)

Shopping List for French Boule
Pantry Staples:
Bread flour
Active Dry Yeast
Fine kosher or sea salt
Granulated sugar (if you don’t have any, you can leave out)
Useful Tools
Mixing bowl – For combining your ingredients
Bench scraper – Helps with shaping and handling dough
Kitchen scale – For accurate measurements
Proofing basket (banneton) For final proofing (nice, but not necessary)
Dutch oven or heavy oven-safe pot – Creates the perfect steamy environment for a crispy crust (see notes if you don’t have one)
Parchment paper – Makes transferring the dough easier
Lame (bread scoring blade) or sharp scissors – For scoring the dough before baking
Cooling rack – To let your bread cool properly after baking

HELPFUL NOTES
Slap and Fold vs. Traditional Kneading
After mixing, your dough needs gluten development for structure. Instead of traditional kneading, this recipe uses the slap and fold method—a technique often used for high-hydration doughs.
Slap and Fold: You grab the dough, slap it onto the surface, then fold it over itself. This helps build strength while keeping the dough light and airy.
Kneading: You can also use the classic kneading method (press, fold, rotate) if you prefer. Either method works—just keep going until the dough is smooth and elastic.
If you’re new to slap and fold, don’t worry! The dough will start sticky, but after a few minutes, it transforms into a smooth, bouncy ball.
Why Steam Matters in Bread Baking
Ever wonder how artisan breads get that crackly, golden crust? The secret is steam.
Steam keeps the surface of the dough moist during the first part of baking, allowing it to expand before the crust sets.
It also helps develop that beautiful shine and deep golden color.
Using a Dutch oven creates a mini steam chamber, locking in moisture for that perfect crust. If you don’t have a Dutch oven, here are some alternatives:
No Dutch Oven? Try These Instead:
→ Heavy Pot with Lid – Use any oven-safe pot (cast iron, ceramic, or stainless steel) with a tight-fitting lid.
→Baking Sheet & Water Pan – Place your bread on a baking stone or sheet, and put a pan of hot water on the lower rack to generate steam.
→ Upside-Down Roasting Pan – Place a large, oven-safe roasting pan over your bread to trap steam.
Understanding Active Dry Yeast
This recipe calls for active dry yeast, which needs to be activated before use. If you prefer, you can swap it for instant yeast, which can be added directly to the flour without proofing.
Active Dry Yeast – Needs to be dissolved in warm water before mixing with the flour.
Instant Yeast – Can be mixed directly with dry ingredients and hydrates in the dough.
Both types work, but if using instant yeast, reduce the amount to 7g (instead of 10g).
French Boules & Why We Shape the Dough This Way
A boule (pronounced "bool") is a round French-style loaf that has a crispy crust and an airy, open crumb. Shaping the dough into a boule helps create tension on the surface, which controls how the bread expands while baking.
To shape a boule:
Flatten the dough slightly into a rectangle.
Fold one side over the other until it forms a cylinder.
Roll and tuck the dough into a round shape, tightening the surface as you go.
This tension helps prevent spreading and ensures a beautiful rise in the oven.
Why You Should Weigh Ingredients for Bread Baking
If you’ve ever struggled with inconsistent bread results, the problem might not be your technique—it could be your measurements! That’s why this recipe only provides weight measurements in grams, not cup measurements.
Why is weighing ingredients better?
✔️ Accuracy: A cup of flour can vary anywhere from 120g to 150g, depending on how it’s scooped. That’s a huge difference in bread baking, where precision is key! Weighing ensures you get the exact amount every time.
✔️ Better Dough Hydration: Too much or too little flour changes how the dough absorbs water, affecting texture and rise. With grams, you’ll always have the perfect balance.
✔️ More Consistent Results: If you want to bake great bread every single time, a digital scale is your best friend.
If you love baking, investing in a kitchen scale is totally worth it. They’re inexpensive, easy to use, and will instantly improve your bread, cakes, cookies—everything. Seriously, once you start using a scale, you’ll never go back to cups!
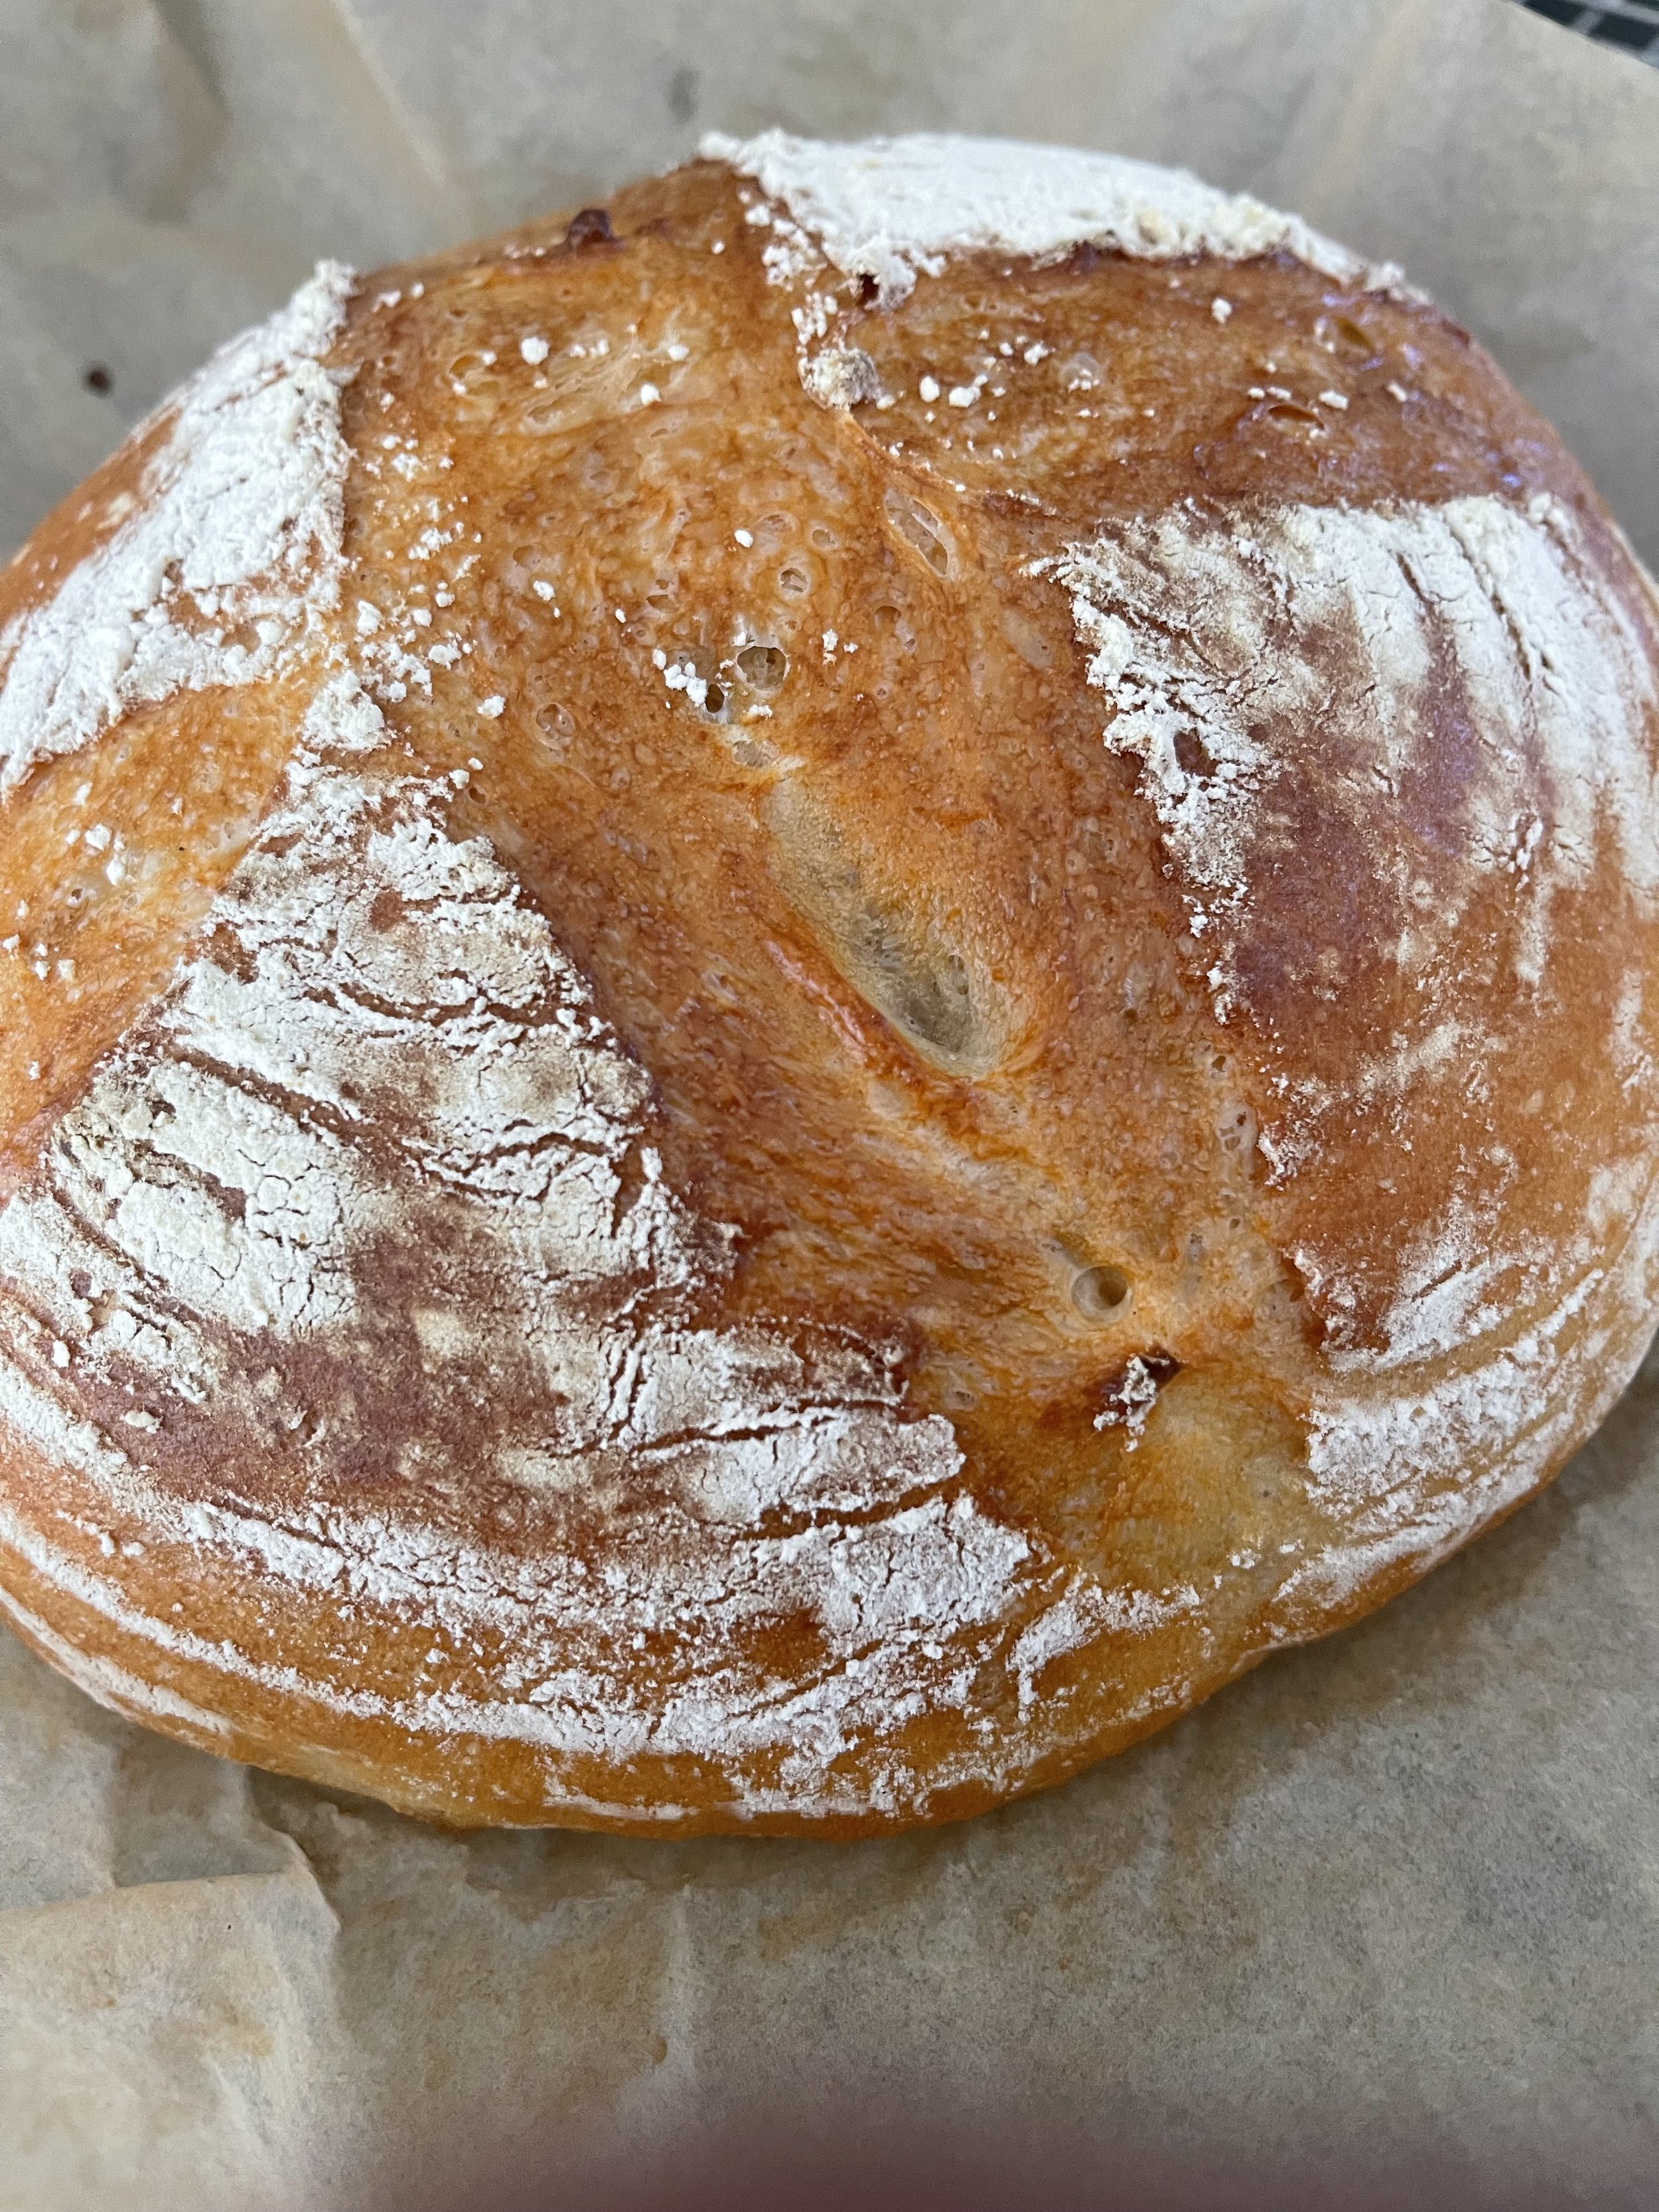
Why Scoring Bread is Important
Scoring (cutting the surface of the dough before baking) allows the bread to expand properly instead of bursting unpredictably.
Use a lame (bread scoring blade), razor, or sharp scissors to create shallow cuts.
Experiment with patterns—a simple slash works, but artistic designs can elevate your loaf!
If you don’t score, the bread will still bake, but it may crack in random places.
Want a pro tip? Dusting the dough with flour before scoring makes the designs stand out beautifully once baked.
How Long Should Bread Cool Before Slicing?
I know—it’s hard to resist fresh-baked bread straight out of the oven. But patience is key!
Cooling lets steam inside the loaf redistribute evenly, preventing a gummy texture.
Cutting too early will release too much moisture, making the bread dense instead of light and airy.
For best results, let your bread cool for at least 1.5 to 2 hours before slicing. The wait is worth it!
Bread Troubleshooting Tips
💡 Dough is too sticky? Let it rest for 5-10 minutes before kneading. A little bench flour is okay, but avoid adding too much—it can make the bread dense.
💡 Bread didn’t rise well? Check your yeast freshness and make sure your kitchen is warm enough for proofing.
💡 Crust too dark? Reduce the final cooking time by 5 or 10 minutes.
💡 Bread too dense? It may be underproofed—let it rise a little longer before baking.
Homemade vs. Store-Bought: Is It Worth It?
A high-quality artisan loaf from the grocery store will set you back $5 to $8. But making it yourself? It costs just $1.73 per loaf, saving you $3.27 to $6.27 each time.
Sure, grabbing a fresh loaf from the store is convenient. But with food prices climbing and ingredient transparency becoming more important, there’s something empowering about knowing you can make your own bread—whenever you want, with ingredients you trust. No preservatives, no mystery additives, just simple, delicious bread made by you. And honestly? It just tastes better.

Fresh Baked
I know—it’s hard to resist fresh-baked bread straight out of the oven. But patience is key!
Cooling lets steam inside the loaf redistribute evenly, preventing a gummy texture. Cutting your bread too early will release too much moisture, making the bread dense instead of light and airy.
For best results, let your bread cool for at least 1.5 to 2 hours before slicing.
INGREDIENTS
Full Size Boule
500g bread flour (all-purpose works too)
10g active dry yeast
10g salt
4g granulated sugar
360g lukewarm water (108-110°F / 42-43°C)
Baby Size Boule
300g bread flour
216g lukewarm water (108-110°F / 42-43°C)
6g active dry yeast (or a full 7g packet)
4g (1 teaspoon) granulated sugar
6g kosher salt
make a French boule with me- no equipment needed…
HOW TO MAKE IT
Mix the Dough:
In a large mixing bowl, combine the flour, yeast, and sugar.
Add the water and mix until a shaggy dough forms.
Cover the bowl with a loose towel and let the dough rest for 20 minutes.
Knead the Dough:
Add the salt and knead using the slap-and-fold method (see notes) on a clean surface.
Continue to slap-and-fold until the dough becomes smooth and no longer sticky.
Shape into a ball and place in a clean bowl to rise until doubled in size (about 1-1.5 hours, depending on room temperature).
Preheat the Oven:
While the dough is rising, preheat your oven to 475°F (246°C).
Place a Dutch oven (without the lid) inside to heat up- leave it in the oven throughout the rising/proofing process.
Shape the Dough:
Gently remove the dough from the bowl and place it on a clean surface.
Flatten it slightly (smooth side down) into a rectangle, then fold one side over the other all the way down the dough.
Roll it into a cylindrical shape, then use a bench scraper or your hands to form a tight, round ball.
Let the dough proof smooth side down in a proofing basket (or on the countertop -smooth side up), covered with a towel for 45 minutes-1 hour.
The dough is ready when a gentle poke slowly springs back to form.
Bake the Bread:
If using a proofing basket, flip the dough onto parchment paper and dust the top with flour.
Score the top using a bread lame or scissors.
Carefully remove the hot Dutch oven from the oven.
Lift the parchment paper with the dough and place it inside the pot.
Add 1-2 ice cubes (or 2-3 tablespoons of water) under the parchment paper to create steam.
Cover with the lid quickly and bake for 30 minutes.
Browning the Bread:
Remove the lid, lower the temperature to 450°F (232°C), and bake for another 15-20 minutes until golden brown.
When browned to your liking, remove the pot from the oven, then carefully remove the bread from the Dutch oven using the parchment paper.
Cool & Enjoy:
Place the bread on a cooling rack for a few minutes, then remove the parchment paper.
Let it cool for at least 1.5 to 2 hours before slicing to prevent a gummy texture.
Slice and enjoy!
Tried This Recipe? Let’s Chat!
I’d love to hear how your French Boule turned out!
💬 Leave a comment below & tell me if you thought it was easy or where you struggled.
📸 Share your photos on Instagram and tag me @YourHandle
📌 Love it? Pin this recipe so you don’t forget it!